Notes
Windows file system
Windows versions
The Windows operating system has a long history dating back to 1985, and currently, it is the dominant operating system in both home use and corporate networks. Because of this, Windows has always been targeted by hackers & malware writers.
Windows XP was a popular version of Windows and had a long-running. Microsoft announced Windows Vista, which was a complete overhaul of the Windows operating system. There were many issues with Windows Vista. It wasn’t received well by Windows users, and it was quickly phased out.
When Microsoft announced the end-of-life date for Windows XP, many customers panicked. Corporations, hospitals, etc., scrambled and tested the next viable Windows version, which was Windows 7, against many other hardware and devices. Vendors had to work against the clock to ensure their products worked with Windows 7 for their customers. If they couldn’t, their customers had to break their agreement and find another vendor that upgraded their products to work with Windows 7. It was a nightmare for many, and Microsoft took note of it.
Windows 7, as quickly as it was released soon after, was marked with an end of support date. Windows 8.x came and left and it was short-lived, like Vista. Then arrived Windows 10, which is the current Windows operating system version for desktop computers. Windows 10 comes in 2 flavors, Home and Pro. You can read the difference between the Home and Pro here. Even though we didn’t talk about servers, the current version of the Windows operating system for servers is Windows Server 2019.Many critics like to bash on Microsoft, but they have made long strides to improve the usability and security with each new version of Windows.
“Microsoft will continue to support at least one Windows 10 Semi-Annual Channel until October 14, 2025”. Windows 11 now is the current Windows operating system for end-users.
File system
The file system used in modern versions of Windows is the New Technology File System or simply NTFS.
Before NTFS, there was FAT16/FAT32 (File Allocation Table) and HPFS (High Performance File System).
You still see FAT partitions in use today. For example, you typically see FAT partitions in USB devices, MicroSD cards, etc. but traditionally not on personal Windows computers/laptops or Windows servers.
NTFS is known as a journaling file system. In case of a failure, the file system can automatically repair the folders/files on disk using information stored in a log file. This function is not possible with FAT.
NTFS addresses many of the limitations of the previous file systems; such as:
- Supports files larger than 4GB
- Set specific permissions on folders and files
- Folder and file compression
- Encryption (Encryption File System or EFS)
On NTFS volumes, you can set permissions that grant or deny access to files and folders.
The permissions are:
- Full control
- Modify
- Read & Execute
- List folder contents
- Read
- Write The below image lists the meaning of each permission on how it applies to a file and a folder.

How can you view the permissions for a file or folder?
- Right-click the file or folder you want to check for permissions.
- From the context menu, select
Properties. - Within Properties, click on the
Securitytab. - In the
Group or user nameslist, select the user, computer, or group whose permissions you want to view.
In the below image, you can see the permissions for the Users group for the Windows folder.
Refer to the Microsoft documentation to get a better understanding of the NTFS permissions for Special Permissions.
Another feature of NTFS is Alternate Data Streams (ADS).
Alternate Data Streams (ADS) is a file attribute specific to Windows NTFS (New Technology File System).
Every file has at least one data stream ($DATA), and ADS allows files to contain more than one stream of data. Natively Window Explorer doesn’t display ADS to the user. There are 3rd party executables that can be used to view this data, but Powershell gives you the ability to view ADS for files.
From a security perspective, malware writers have used ADS to hide data.
Not all its uses are malicious. For example, when you download a file from the Internet, there are identifiers written to ADS to identify that the file was downloaded from the Internet.
To learn more about ADS, refer to the following link from MalwareBytes here.
Windows System 32 folder
The Windows folder (C:\Windows) is traditionally known as the folder which contains the Windows operating system.
The folder doesn’t have to reside in the C drive necessarily. It can reside in any other drive and technically can reside in a different folder.
This is where environment variables, more specifically system environment variables, come into play. Even though not discussed yet, the system environment variable for the Windows directory is %windir%.
Per Microsoft, “Environment variables store information about the operating system environment. This information includes details such as the operating system path, the number of processors used by the operating system, and the location of temporary folders”.
The System32 folder holds the important files that are critical for the operating system.
You should proceed with extreme caution when interacting with this folder. Accidentally deleting any files or folders within System32 can render the Windows OS inoperational. Read more about this action here.
Note: Many of the tools that will be covered in the Windows Fundamentals series reside within the System32 folder.
User Account
User accounts can be one of two types on a typical local Windows system: Administrator & Standard User.
The user account type will determine what actions the user can perform on that specific Windows system.
An Administrator can make changes to the system: add users, delete users, modify groups, modify settings on the system, etc. A Standard User can only make changes to folders/files attributed to the user & can’t perform system-level changes, such as install programs. You are currently logged in as an Administrator. There are several ways to determine which user accounts exist on the system.
One way is to click the Start Menu and type Other User. A shortcut to System Settings > Other users should appear.
If you click on it, a Settings window should now appear. See below.
Since you’re the Administrator, you see an option to Add someone else to this PC.
Click on the local user account. More options should appear: Change account type and Remove.
Click on Change account type. The value in the drop-down box (or the highlighted value if you click the drop-down) is the current account type.
When a user account is created, a profile is created for the user. The location for each user profile folder will fall under is C:\Users.
For example, the user profile folder for the user account Max will be C:\Users\Max.
The creation of the user’s profile is done upon initial login. When a new user account logs in to a local system for the first time, they’ll see several messages on the login screen. One of the messages, User Profile Service, sits on the login screen for a while, which is at work creating the user profile. See below.
Once logged in, the user will see a dialog box similar to the one below (again), indicating that the profile is in creation.
Each user profile will have the same folders; a few of them are:
- Desktop
- Documents
- Downloads
- Music
- Pictures
Another way to access this information, and then some, is using Local User and Group Management.
Right-click on the Start Menu and click Run. Type lusrmgr.msc. See below
Back to lusrmgr, you should see two folders: Users and Groups.
If you click on Groups, you see all the names of the local groups along with a brief description for each group.
Each group has permissions set to it, and users are assigned/added to groups by the Administrator. When a user is assigned to a group, the user inherits the permissions of that group. A user can be assigned to multiple groups.
Note: If you click on Add someone else to this PC from Other users, it will open Local Users and Management.
User Account Control
The large majority of home users are logged into their Windows systems as local administrators. Remember from the previous task that any user with administrator as the account type can make changes to the system.
A user doesn’t need to run with high (elevated) privileges on the system to run tasks that don’t require such privileges, such as surfing the Internet, working on a Word document, etc. This elevated privilege increases the risk of system compromise because it makes it easier for malware to infect the system. Consequently, since the user account can make changes to the system, the malware would run in the context of the logged-in user.
To protect the local user with such privileges, Microsoft introduced User Account Control (UAC). This concept was first introduced with the short-lived Windows Vista and continued with versions of Windows that followed.
Note: UAC (by default) doesn’t apply for the built-in local administrator account.
How does UAC work? When a user with an account type of administrator logs into a system, the current session doesn’t run with elevated permissions. When an operation requiring higher-level privileges needs to execute, the user will be prompted to confirm if they permit the operation to run.
Let’s look at the program on the account you’re currently logged into, the built-in administrator account—Right-click to view its Properties.
In the Security tab, we can see the users/groups and their permissions to this file. Notice that the standard user is not listed.
Log in as the standard user and try to install this program. To do this, you can remote desktop into the machine as the standard user account.
Note: You have the username and password for the standard user. It’s visible in lusrmgr.msc.
Before installing the program, notice the icon. Do you see the difference? When you’re logged in as the standard user, the shield icon is on the program’s default icon. See below.
This shield icon is an indicator that UAC will prompt to allow higher-level privileges to install the program.
Double-click the program, and you’ll see the UAC prompt. Notice that the built-in administrator account is already set as the user name and prompts the account’s password. See below.
After some time, if a password is not entered, the UAC prompt disappears, and the program does not install.
This feature reduces the likelihood of malware successfully compromising your system. You can read more about UAC here.
System Configuration
The System Configuration utility (MSConfig) is for advanced troubleshooting, and its main purpose is to help diagnose startup issues.
Note: You need local administrator rights to open this utility.
The utility has five tabs across the top. Below are the names for each tab. We will briefly cover each tab in this task.
- General
- Boot
- Services
- Startup
- Tools
In the General tab, we can select what devices and services for Windows to load upon boot. The options are: Normal, Diagnostic, or Selective.
In the Boot tab, we can define various boot options for the Operating System.
The Services tab lists all services configured for the system regardless of their state (running or stopped). A service is a special type of application that runs in the background.
As you can see, Microsoft advises using Task Manager (taskmgr) to manage (enable/disable) startup items. The System Configuration utility is NOT a startup management program.
Computer Management
We’re continuing with Tools that are available through the System Configuration panel.
The Computer Management (compmgmt) utility has three primary sections: System Tools, Storage, and Services and Applications.
Let’s start with Task Scheduler. Per Microsoft, with Task Scheduler, we can create and manage common tasks that our computer will carry out automatically at the times we specify.
A task can run an application, a script, etc., and tasks can be configured to run at any point. A task can run at log in or at log off. Tasks can also be configured to run on a specific schedule, for example, every five mins.
To create a basic task, click on Create Basic Task under Actions (right pane). Next is Event Viewer.
Event Viewer allows us to view events that have occurred on the computer. These records of events can be seen as an audit trail that can be used to understand the activity of the computer system. This information is often used to diagnose problems and investigate actions executed on the system.
Event Viewer has three panes.
- The pane on the left provides a hierarchical tree listing of the event log providers. (as shown in the image above)
- The pane in the middle will display a general overview and summary of the events specific to a selected provider.
- The pane on the right is the actions pane.
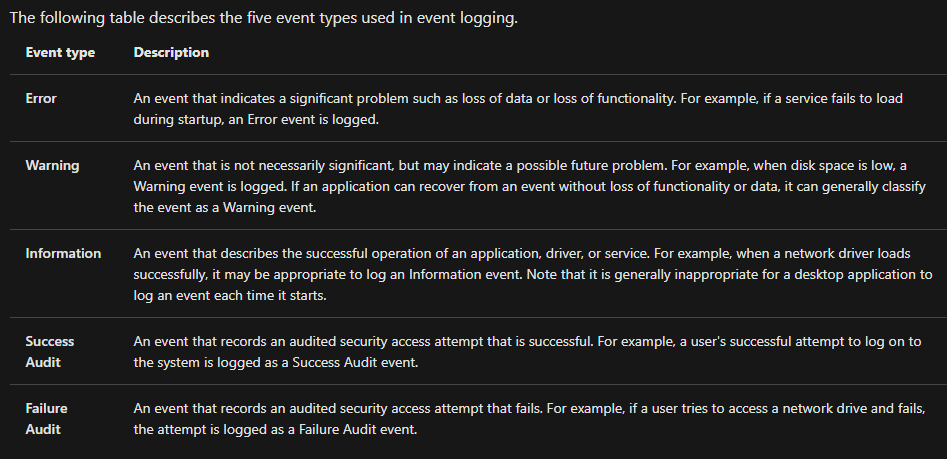
There are five types of events that can be logged. Below is a table from docs.microsoft.com providing a brief description for each.
and many more information on windows on tryhackme rooms ….